Showing posts with label #PinitDoit. Show all posts

Wednesday, October 31, 2012

Pin It and Do It #17: Felt house lantern

It's the end of October and the end of a wonderful Pin It and Do It -Challenge hosted by Trish in Love, Laughter and a Touch of Insanity. It's been so much fun! I wish I had more time to make everything but I didn't quite reach my goal of 8 pins.

This felt house lantern is the sixth pin I made this October but I have two bigger projects in process, one is a knitted cowl and one is my bookshelf makeover. I'll post more about those once they are finished.

This pin from duitang.com was my inspiration. The original site is in Chinese but it doesn't matter because the source doesn't give any more information on how to make this lantern. From the photos I gathered that they use felt, cut it after the given pattern, hand-stitch all seams and then use some kind of startch to harden fabric. I assume there's a led light inside the lantern, otherwise those cute little houses would go up in flames!

I will definitely make these with white felt later but I had some red felt in storage so this is my prototype. Good thing is my felt is so thick I had no need for startch.


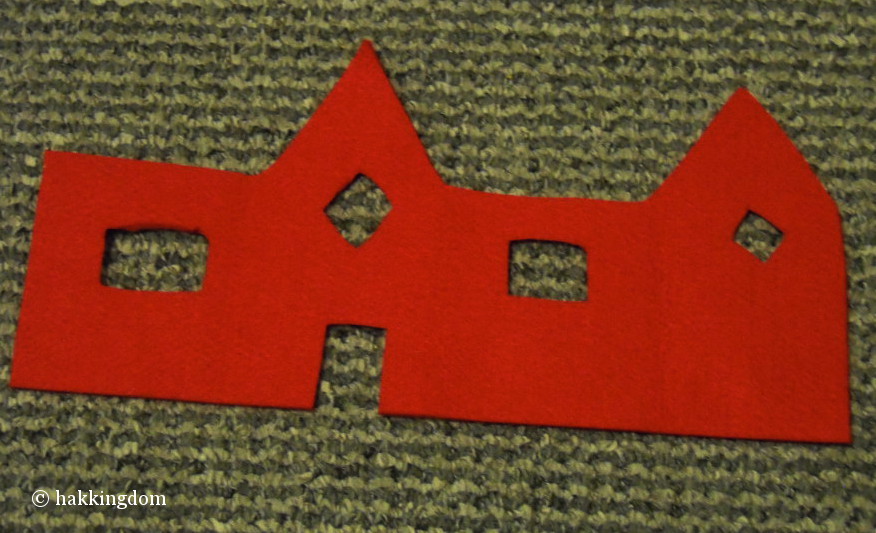
As you can see I didn't follow the original shape and after making this my tip is that it's actually better if you cut each wall separately, and the roof. It means more stitching but it also makes all seams thicker. With this one piece I still had to stitch the corners of this house to make the shape right.


And here's the final product with led candle inside. Sorry the photo is a bit blurry.


Just a reminder of other pins I made during this #PinItDoIt challenge:

Illustrated tote bag
Faux leather Christmas ornaments
Pine cone ball
Christmas table decoration
Baubel Christmas tree

I had a great time making these and I hope you've had a creative October too!


Monday, October 29, 2012

Pin It and Do It #16: Baubel Christmas Tree

Pinterest is full of contemporary Christmas tree ideas so I decided to make one decoration that is easy to move and showcases different kinds of decorations. This pin was my inspiration, originally from Better Homes and Gardens.

The original pin was a DIY wire Christmas tree wall decoration but I had this wooden fan trellis that I thought I could use instead of wire.


It really does look like an ordinary fan trellis until you paint it white and turn it upside down!


Add some baubels and you've got a nice addition to your holiday decorations. I do think this needs some sort of a star tree topper but I didn't have any that would match these colors. I'll have to add it to my ever growing list of DIY projects to do.


It's such a shame to put this away to wait for Christmas but it is still a bit early to have these kind of decos lying aroung the house, right?

Friday, October 26, 2012

Pin It and Do It #15: Christmas table decoration

I'm dreaming of a silver sparkling Christmas! It may even come true if I keep spraying everything I own with white, silver and glitter paint. I've pinned lots of holiday table decorations that are made with some reindeer toys, candles, pinecones, twigs and bottle brush trees. I'm definitely making some bottle brush trees later because they are super cute and I don't think any stores sell those here in Finland.

So I decided to make my own table decoration for Christmas and I used these pins as inspiration: this one from citrusandorange, this one from Design Shimmer, this one from CountryLiving (just look at those crazy decor prices!) and this one from hom-e tumblr.


I bought my little deer toys from BR-Lelut and Christmas trees from Sokos. Those trees were on sale for only one euro each! The only problem was this original color:


Lots of silver spray, spray glue and glitter shaking and the trees changed into more subtle color:


I really like how those trees sparkle in the dim light. Now I only wish I would've bought more of them! Oh well, one more reason to make those bottle brush trees later.


Just a reminder: This is the fourth pin I've made for the October 2012 #PinitDoit challenge but to keep track of the total of pins I've made I'll keep the original number in my headlines. I hope it's not too confusing.

Thursday, October 25, 2012

Pin It and Do It #14: DIY pine cone ball

It's time to make more Christmas decorations! While I was at our summer cottage in April I collected one giant bag of alder cones because they are so small and pretty and perfect for crafts! So pardon my misleading headline but you could make these decorations with pine cones too. This pin was my inspiration, originally from Tracy's Trinkets and Treasures.

All you need is a styrofoam ball, a hot glue gun and some pine or alder cones.


If anybody knows a way to do this without burning your fingertips off, let me know. It was challenging.


For a more rustic look I might have left the ball as it is, but you know me, I paint everything white! So here's the finished decoration after I sprayed it white. I'm making another one too so I can use these as table decorations on both ends of the table. I really like this frosty look.


Just a reminder: This is the third pin I've made for the October 2012 #PinitDoit challenge but to keep track of the total of pins I've made I'll keep the original number in my headlines. I hope it's not too confusing.

Sunday, October 21, 2012

Pin It and Do It #13: DIY Christmas ornaments

I have an unhealthy obsession with faux leather and after I bought some in silver color I’ve been going through my pins trying to decide what to do with it. It is Christmas soon and it’s my absolute favorite time of year, so some DIY Christmas ornaments are a good choice, right?


You know when you think of something and it looks really good in your mind and then the result just looks a little too handmade? That’s been my problem this week. I thought it would be easy to make faux leather versions of some of the Christmas decors I’ve been pinning, but paper and leather are nothing alike. Or even fabric and leather. Or maybe it’s just my non-existent hand stitching skills?

Now my apartment looks like something between a spaceship and Santa’s workshop. I have leather scraps all over the place and while it certainly is “bling” it’s not the sophisticated metallic look I was after.

Anyway, I started with this pin of fabric tree decorations as my inspiration. I can't seem to find the original post but that picture is from Designhund. I love silver faux leather as it is, but I decided to add even more sparkle with some sequins. Oh, and dotted ribbon! You can never have too much dots.


The problem with this one was that I can't stitch hidden seams so I had to turn this inside out to hide the seams and the other seam is just wrinkled and ugly. I need lots more practice!

Because I wasn't happy with the first deco, I tried to make something without seams or sewing. With this pin in mind (from How About Orange) I soon realized that  faux leather is too soft and won't hold the shape like paper would. This sorry excuse for a baubel is my result.


The third deco I made is a variation from the first one. Round shape should be easier to make and this time I used a sewing machine and sew the seamline on right side of deco. I filled these with absorbent cotton.


I'm not too thrilled with these results and I certainly won't be making enough of these to decorate a whole Christmas tree, but maybe once I learn this technique a bit better I might use these as gift tags? I like the idea of faux leather and sequins, so I think I'll try to make some sort of garland too and see if it looks any better. Just wait and see!

Tuesday, October 9, 2012

Pin It and Do It #12: DIY illustrated shopping bag

What is this I see? An update on this blog? I'm happy to say that I'm back with somewhat regular posting schedule and I'm ready to make some of the 4000+ things I've pinned on Pinterest! I have a new laptop, I'm trying to learn to use the new version of GIMP and I'm super excited that Trish from Love, Laughter and a Touch of Insanity is hosting another Pinteresting Challenge. This challenge ends October 31st and since I'm already a bit late with starting all this I better hurry up!

Please note that this is the first pin I made for the October 2012 #PinitDoit challenge but to keep track of the total of pins I've made I'll keep the original number in my headlines. I hope it's not too confusing.

So, the first thing I decided to make was an illustrated shopping bag and it was inspired by this pin. The original picture is of a tote bag with potato stamped triangles. I love the look and I might make something just like that in the future, but lately I've been pinning dozens of pictures of illustrations and patterns, so they inspired me to make my own hand illustrated bag.


I started with a plain white fabric bag (no, I didn't make it myself) and used a black textile marker.


First I made a rough sketch on paper to see how to scale things and then I just took the pen and began to draw. I wanted this to be black and white but some color details might be fun too? After I finished drawing I let the ink to dry and then ironed over the picture to make it waterproof. Next time it rains I'll see how successful I was ;) All in all this was a really fun and quick project and I'm thinking some people will get my hand illustrated bags as a Christmas gift this year!


Yes, the other side is just white. I didn't want to draw this same picture twice so I'll have to wait for another inspiration to strike. I hope you are having a good week and lots of fun with both Pinterest and this Pin It and Do It -challenge!

Saturday, June 16, 2012

Pin It and Do It #11: Nail house number

It has rained for almost a week here at our summer cottage so I haven't been feeling very crafty. All garden projects are on hold but I decided to continue with the Pin It and Do It -challenge on my own. The official challenge was in May and now I'm making these just for fun because Pinterest is such a great source of inspiration!

My dad built our summer cottage 20 years ago. The house has been without a proper house number all that time, so it was time to make one. I found this great idea for house number via Pinterest, originally from blog Lotta Agaton.

All you need is some nails and a hammer. This is great anger management too. Just saying.


Use a bigger nail to mark the places for smaller nails. This makes hammering easier and you will have somewhat straight rows of nails.


Start hammering from the middle of each number and then move to make the outlines. Make sure all your nails are in place. It's difficult to hammer some missing nail into the center of the number afterwards.

Here's my finished house number plate. I haven't decided yet if I'm going to paint those nails darker later. Maybe some contrast would look better? It would be fun to make some texts with nails too.

Thursday, May 31, 2012

Pin It and Do It #10: Hanging herb garden

This is it. The end of May and the end of Pin It and Do It -challenge hosted by Trish. I'm so glad I saw that banner on Pinterest and I'm so glad I took the time and made some things I've pinned. Creating something is the best form of therapy, it relaxes and activates you at the same time. Or maybe it's just doing something you love.

I've had times in my life when I didn't have any spare time to do anything for myself. I didn't even think about myself. It was all work and no play. I didn't do anything creative during those two years and it really affected my mood. I was like a robot.

After that experience I've learned to value my free time. Nobody will waste my time without my permission. And it looks like I learned the hard way that no amount of money will make me as happy as creating something small, even if it was a little bow or a handwritten envelope.

So enough of this rambling and let's get this show on the road. Or to the end of the road, because this challenge ends here. My final #PinItDoIt creation was a hanging herb garden. Again, a simple idea but one I wouldn't have thought of without Pinterest. I've pinned many pictures as inspiration to my Garden ideas board. The wall I made here was a combination of many pins.

Here's what I started with. I had a plain corner on my balcony and a brown trellis.


I knew I wanted this hanging herb garden to be white, as I wish all my furnitures and interior design would be. I guess that's called Scandinavian style. I call it white all over. I won't bore you with the details of how I hammered some cans because lillys & lollipops already has a great tutorial of how to make a hanging tin can herb garden.

I don't know why but I've never upcycled tin cans into any crafts projects before. I'm sure I will use more of these in the future, I can definitely see the appeal. As lanterns, maybe?


After some hours of hammering and painting, I give you the result: My white hanging herb garden. It turned out just the way I imagined, I'm so happy!


Thank you Trish for encouraging us to make things we've pinned. I know I'll continue making my pins even though the official challenge has ended! It was so much fun, let's do this again!

Wednesday, May 30, 2012

Pin It and Do It #9: Nautical medal brooch

I was supposed to post about my vertical garden wall today, but as all my projects, it seems to be more time-consuming than I thought. So I'll give you the nautical medal brooch instead.

Some of the inspiration for this brooch came from this pin. The original is from CelessaBazaar's Etsy Shop. I love all things nautical! I wanted my brooch to look like a medal but have some vintage edge. It really just formed this way based on the supplies I had.


The striped ribbon is from Sokos, the lace ribbon and frames are from Tiimari and nautical charms are from Sinelli. I painted those charms white with acrylic paint because I wanted them to stand out from the frame. I also added a little bead and a safety pin to the final brooch.


All aboard!

Tuesday, May 29, 2012

Pin It and Do It #8: Hedgehog pincushion

Now that I've been actually sewing something for a change I noticed that I desperately need a new pincushion. The one I had was literally over 20 years old (I made it when I was 10) and it was a hard, small lump. I think I broke a couple of pins when using it.

Thanks to Pinterest, it was easy for me to choose this awesome little hedgehog pincushion for my next Pin It and Do It -project. You can find the amazing tutorial here or visit alsn's Etsy shop if you don't want to make your own pincushion. On a sidenote, you have no idea how hard it is to write hedgehog when English is not your first language. There's something about that word that just turns into gibberish when I write it...

I had bought the fabric already a couple of years ago from Eurokangas. I often buy some fabrics and think I'll make something and then forget them or think they were the wrong color or pattern. With this fabric I loved the color but I didn't like those people figures. I knew I would be using the striped parts only.


I had a couple of problems while making this pincushion. The first problem was those little ears. I may or may not have attached them the wrong way twice. Three-dimensional conceptualization is not my forte and I was too lazy to follow the tutorial step by step. My bad. The second problem was the fact that this pincushion has to be actually handstitched. I re-read the tutorial and couldn't believe that sewing machine was a no-no with this one but it is, those pieces are just too curvy.


I'm not sure when was the last time I handstitched something. Maybe around the same time I made my one and only pincushion. My stitches really look like crow's feet, I have no idea how to do them properly. I had to make a double seam every time to make it all stay in one piece. I used fabric scraps to fill the cushion.


I made those eyes and nose from wooden beads and tail and ears from lace ribbon. Oh, and I added a wristband as you can see. I always wear pincushion on my wrist when I'm sewing. The original tutorial said that making this hedgehog would take an hour. Ummm, yeah. I'm not going to tell you how many hours I stitched this but hopefully my new pincushion will last for 20 years like my previous one! It was worth all the hard work though because I think it looks really cute.


P.S. I don't have a liver problem if you're worried about my skin tone. That's just the energy saving bulbs I have on because it is 11 p.m. here now. YES it took me ages to make this pincushion!

Monday, May 28, 2012

Pin It and Do It #7: Lace trim shirt

A couple of weeks ago I was shopping at Gina Tricot and found this lovely Juliette aztec top. Sorry it's all wrinkled here:


I really love that pattern so I bought it, and it was on sale for only 5 euros! Bad news is the only size they had left was XS and no amount of wishful thinking will squeeze me into an extra-small shirt. So, I knew I had to do some sort of makeover with this one, and then I remembered this pin.

The original picture is from Trash To Couture, and if you aren't already a regular reader of that blog, you should. She makes amazing, fashionable things from whatever old clothes she has. That blog is such an inspiration!

I didn't have crochet trim, but I had some sort of mesh lace fabric that I bought earlier from Eurokangas and I've been waiting to make something with it! I cut open those side seams, added a scrap of lace and sewed the whole thing back together. It took maybe 30 minutes but I have a feeling this will be one of my favorite summer shirts:


Hmm... Can I add lace trims to all my shirts?

Wednesday, May 23, 2012

Pin It and Do It #6: Rock garden markers

As soon as I saw these rock garden markers on Pinterest (originally from this blog), I knew I would be making some myself. Such a clever idea, easy to clean and doesn't get ruined even if it rains. I happen to have many jars of stones that I collected as a child when I spent my holidays in Crete.

At one point I almost threw those stones away, because I was on a cleaning spree and I thought there's no sense in storing stones in jars. There's even less sense dragging those stones across the world with a heavy suitcase. I mean, a stone is a stone. Of course it's shaped by the sea and it's a memory of the place you've visited, but no more stones for me. I have plenty.

So, this Pin It and Do It -challenge gave me a good reason to make something useful with my stones. I used acrylic paint like the blog suggested. It's water-soluble when you paint but then dries quickly and becomes water-resistant. My tip is to use a small but hard brush, otherwise the color will smear. I wrote all texts and details with a permanent marker.

I wish it was June already and I could go to our summer cottage and plant all the seeds I have and then put these to good use. It makes me happy to know that I'll have a little piece of Crete in my garden this summer.

Sunday, May 20, 2012

Pin It and Do It #5: DIY dreamcatcher

While this rainy weather forced me to stay indoors, it also gave me some spare time to continue with the Pin It and Do It -challenge. I chose a dreamcatcher as my fifth project for the challenge. Here's the original picture by Fryd that I used as inspiration, although in the end I only used similar color theme and the rest was something different.

Before you scream "sacrilege!" I'll admit I couldn't be further away from traditional Native American culture. I've never seen a real dreamcatcher so this one is only my humble version of it.

I wanted the center net part to look like a spider web, and the decorations to look like feathers without using real feathers. I used translucent Cromático paper for the feathers, and it was a great choice. That paper is almost plastic-like and it was really easy to cut and then fold the way I wanted. The color selection they have is amazing and all colors really pop from translucent paper.

First I used transparent tape to attach the feathers but later covered them with pink sticker tape to make it prettier.


The circle was made from disposable paper plate. I cut the center part away and folded the edges towards center and then covered it with lace ribbon.

Here's the finished dreamcatcher. I hope it helps me have better dreams by catching all the bad ones into that net.


Monday, May 14, 2012

Pin It and Do It #4: Marshmallow pops

The Pin It and Do It -challenge continues. This pin was my inspiration when I was thinking of something sweet and small I could give as a present to my mom on Mother's Day. The original picture was from Cakes&Sweets tumblr page.

I'm really not good when it comes to baking or creating some dessert chocolate mini gourmet bites. I like to buy that stuff from a confectionery and not spend hours trying to create something that looks like a blob of melted sugar. That's why I was bit sceptical with this project and I had no back-up plan. It was either going to work out or I had no present at all to give!

After I had already melted all the chocolate I realized I had nothing to stick those pops into. I rummaged through my closets and found a sponge I had bought for another DIY project. I wrapped it into silk paper and my tray was ready to go.

The process of making these marshmallow pops wasn't easy either. I think the chocolate was too thin so it was really messy and dribbled all over. Also I shoud've put those finished pops straight into fridge so the topping would've hardened faster but in the end it all worked out fine for a first try and I'm quite proud with the results! I'll definitely make more later (but never for a big group of guests).


P.S. My mom loved these. She couldn't decide which one was her favorite, but she usually loves hazelnuts so I'm guessing that was the most popular option.

Sunday, May 13, 2012

Pin It and Do It #3: Sewn paper garland

While I was helping my mother with our Mother's Day lunch preparations I decided to make some decorations for our table. I love paper crafts, so I decided to make this cute paper garland from Cocoa Daisy. I didn't have as many pretty papers as the original, but I was still happy with the result.
I didn't know you can sew paper. I still think I'll avoid it in the future if possible, because it was more difficult than one might think. All threads get tangled very easily and if you choose too thin paper you're in trouble. Good thing is that this garland is easy to storage: you can just fold it back and put it into envelope.


Saturday, May 12, 2012

Pin It and Do It #2: Asparagus with cheese and pine nuts

I just love asparagus. The best part of spring is that all the grocery stores are packed with piles of asparagus. Another great thing about asparagus is that it's really low on calories so I can eat crazy amounts of it! I restrained myself today though, as you can see from the pic below. That is a moderate portion.

This is also the second part for Pin It and Do It -challenge. The original recipe that inspired me is from Kalyn's Kitchen. I just went crazy with it and added more stuff than in the original recipe but trust me, all these flavors go great together!


My take on the recipe has asparagus, eggs, pine nuts, serrano ham (fried until crispy) and parmesan cheese flakes. Delicious!

Friday, May 11, 2012

Pin It and Do It #1: Nesting material cage for birds

I am participating in the May 2012 Pin It and Do It -challenge. I have only recently started to use Pinterest but I'm already so addicted I could browse those pictures for hours and hours every day! This challenge forces us to actually make something instead of just pinning like crazy and then forgetting all the good ideas.

I visited our summer cottage in the beginning of May and birds here in Finland are just beginning to build their nests and choose the best ones of all the bird houses we have hanged. I thought it would be a good timing to offer them some nesting material.

My inspiration was this post that explains the use of suet cage nester. Only I didn't have a suet cage, so I decided to make one myself from twigs. Sooo... first I used cord that wasn't soft enough and all the knots I made opened later. Then I used jute rope to make this really environmentally friendly. Here's the finished cage.


The birds didn't show any interest towards this during those two days we were there, but I'll go back in a couple of weeks and I hope some of those yarn scraps will be gone by then!