Wednesday, October 31, 2012

Pin It and Do It #17: Felt house lantern

It's the end of October and the end of a wonderful Pin It and Do It -Challenge hosted by Trish in Love, Laughter and a Touch of Insanity. It's been so much fun! I wish I had more time to make everything but I didn't quite reach my goal of 8 pins.

This felt house lantern is the sixth pin I made this October but I have two bigger projects in process, one is a knitted cowl and one is my bookshelf makeover. I'll post more about those once they are finished.

This pin from duitang.com was my inspiration. The original site is in Chinese but it doesn't matter because the source doesn't give any more information on how to make this lantern. From the photos I gathered that they use felt, cut it after the given pattern, hand-stitch all seams and then use some kind of startch to harden fabric. I assume there's a led light inside the lantern, otherwise those cute little houses would go up in flames!

I will definitely make these with white felt later but I had some red felt in storage so this is my prototype. Good thing is my felt is so thick I had no need for startch.


As you can see I didn't follow the original shape and after making this my tip is that it's actually better if you cut each wall separately, and the roof. It means more stitching but it also makes all seams thicker. With this one piece I still had to stitch the corners of this house to make the shape right.


And here's the final product with led candle inside. Sorry the photo is a bit blurry.


Just a reminder of other pins I made during this #PinItDoIt challenge:

Illustrated tote bag
Faux leather Christmas ornaments
Pine cone ball
Christmas table decoration
Baubel Christmas tree

I had a great time making these and I hope you've had a creative October too!


Monday, October 29, 2012

Pin It and Do It #16: Baubel Christmas Tree

Pinterest is full of contemporary Christmas tree ideas so I decided to make one decoration that is easy to move and showcases different kinds of decorations. This pin was my inspiration, originally from Better Homes and Gardens.

The original pin was a DIY wire Christmas tree wall decoration but I had this wooden fan trellis that I thought I could use instead of wire.


It really does look like an ordinary fan trellis until you paint it white and turn it upside down!


Add some baubels and you've got a nice addition to your holiday decorations. I do think this needs some sort of a star tree topper but I didn't have any that would match these colors. I'll have to add it to my ever growing list of DIY projects to do.


It's such a shame to put this away to wait for Christmas but it is still a bit early to have these kind of decos lying aroung the house, right?

Friday, October 26, 2012

Pin It and Do It #15: Christmas table decoration

I'm dreaming of a silver sparkling Christmas! It may even come true if I keep spraying everything I own with white, silver and glitter paint. I've pinned lots of holiday table decorations that are made with some reindeer toys, candles, pinecones, twigs and bottle brush trees. I'm definitely making some bottle brush trees later because they are super cute and I don't think any stores sell those here in Finland.

So I decided to make my own table decoration for Christmas and I used these pins as inspiration: this one from citrusandorange, this one from Design Shimmer, this one from CountryLiving (just look at those crazy decor prices!) and this one from hom-e tumblr.


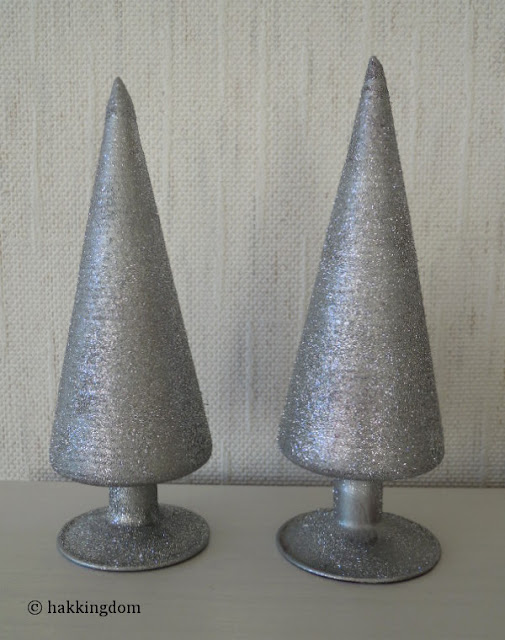
I bought my little deer toys from BR-Lelut and Christmas trees from Sokos. Those trees were on sale for only one euro each! The only problem was this original color:


Lots of silver spray, spray glue and glitter shaking and the trees changed into more subtle color:


I really like how those trees sparkle in the dim light. Now I only wish I would've bought more of them! Oh well, one more reason to make those bottle brush trees later.


Just a reminder: This is the fourth pin I've made for the October 2012 #PinitDoit challenge but to keep track of the total of pins I've made I'll keep the original number in my headlines. I hope it's not too confusing.

Thursday, October 25, 2012

Pin It and Do It #14: DIY pine cone ball

It's time to make more Christmas decorations! While I was at our summer cottage in April I collected one giant bag of alder cones because they are so small and pretty and perfect for crafts! So pardon my misleading headline but you could make these decorations with pine cones too. This pin was my inspiration, originally from Tracy's Trinkets and Treasures.

All you need is a styrofoam ball, a hot glue gun and some pine or alder cones.


If anybody knows a way to do this without burning your fingertips off, let me know. It was challenging.


For a more rustic look I might have left the ball as it is, but you know me, I paint everything white! So here's the finished decoration after I sprayed it white. I'm making another one too so I can use these as table decorations on both ends of the table. I really like this frosty look.


Just a reminder: This is the third pin I've made for the October 2012 #PinitDoit challenge but to keep track of the total of pins I've made I'll keep the original number in my headlines. I hope it's not too confusing.

Sunday, October 21, 2012

Pin It and Do It #13: DIY Christmas ornaments

I have an unhealthy obsession with faux leather and after I bought some in silver color I’ve been going through my pins trying to decide what to do with it. It is Christmas soon and it’s my absolute favorite time of year, so some DIY Christmas ornaments are a good choice, right?


You know when you think of something and it looks really good in your mind and then the result just looks a little too handmade? That’s been my problem this week. I thought it would be easy to make faux leather versions of some of the Christmas decors I’ve been pinning, but paper and leather are nothing alike. Or even fabric and leather. Or maybe it’s just my non-existent hand stitching skills?

Now my apartment looks like something between a spaceship and Santa’s workshop. I have leather scraps all over the place and while it certainly is “bling” it’s not the sophisticated metallic look I was after.

Anyway, I started with this pin of fabric tree decorations as my inspiration. I can't seem to find the original post but that picture is from Designhund. I love silver faux leather as it is, but I decided to add even more sparkle with some sequins. Oh, and dotted ribbon! You can never have too much dots.


The problem with this one was that I can't stitch hidden seams so I had to turn this inside out to hide the seams and the other seam is just wrinkled and ugly. I need lots more practice!

Because I wasn't happy with the first deco, I tried to make something without seams or sewing. With this pin in mind (from How About Orange) I soon realized that  faux leather is too soft and won't hold the shape like paper would. This sorry excuse for a baubel is my result.


The third deco I made is a variation from the first one. Round shape should be easier to make and this time I used a sewing machine and sew the seamline on right side of deco. I filled these with absorbent cotton.


I'm not too thrilled with these results and I certainly won't be making enough of these to decorate a whole Christmas tree, but maybe once I learn this technique a bit better I might use these as gift tags? I like the idea of faux leather and sequins, so I think I'll try to make some sort of garland too and see if it looks any better. Just wait and see!

Tuesday, October 9, 2012

Pin It and Do It #12: DIY illustrated shopping bag

What is this I see? An update on this blog? I'm happy to say that I'm back with somewhat regular posting schedule and I'm ready to make some of the 4000+ things I've pinned on Pinterest! I have a new laptop, I'm trying to learn to use the new version of GIMP and I'm super excited that Trish from Love, Laughter and a Touch of Insanity is hosting another Pinteresting Challenge. This challenge ends October 31st and since I'm already a bit late with starting all this I better hurry up!

Please note that this is the first pin I made for the October 2012 #PinitDoit challenge but to keep track of the total of pins I've made I'll keep the original number in my headlines. I hope it's not too confusing.

So, the first thing I decided to make was an illustrated shopping bag and it was inspired by this pin. The original picture is of a tote bag with potato stamped triangles. I love the look and I might make something just like that in the future, but lately I've been pinning dozens of pictures of illustrations and patterns, so they inspired me to make my own hand illustrated bag.


I started with a plain white fabric bag (no, I didn't make it myself) and used a black textile marker.


First I made a rough sketch on paper to see how to scale things and then I just took the pen and began to draw. I wanted this to be black and white but some color details might be fun too? After I finished drawing I let the ink to dry and then ironed over the picture to make it waterproof. Next time it rains I'll see how successful I was ;) All in all this was a really fun and quick project and I'm thinking some people will get my hand illustrated bags as a Christmas gift this year!


Yes, the other side is just white. I didn't want to draw this same picture twice so I'll have to wait for another inspiration to strike. I hope you are having a good week and lots of fun with both Pinterest and this Pin It and Do It -challenge!

Sunday, June 24, 2012

Weekly Wrap-up: My laptop is dead

Happy Midsummer! I'm sorry to say that my laptop has died and I'm in the middle of nowhere at our summer cottage with no access to any kind of technology. I don't know when I'll be able to update my little blog next time, but I hope it will be sooner rather than later.

We had a lovely Midsummer celebration here and I made us a midsummer pole because we are close to the Swedish-speaking areas of Finland so I thought we can get away with it. I've eaten more sausages than I can ever dream of and I'm trying to get back to some kind of routines and normal eating again.

Enjoy the summer! I'll be back with a recovered laptop as soon as I can! You can read more about Finnish Midsummer from Lonely Planet.